BareMetal-C
BareMetal-C Tool Setup for Windows / macOS
0. Conventions, guidelines, and WSL preparation
Conventions:
This is what you should type or copy & paste into computer (example):
type, copy & paste, or take action.
and if you see a vertical line | to the left of a box,
the text in the box with | on the left is the output from the computer (example):
I am the output from the computer
- Windows: contains specific Windows only information.
- macOS: contains specific macOS only information.
Guidelines:
Windows and macOS:
We strongly recommend you to create a new administrator level user for this class. Some of the software can run more easily.
For the new username, DO NOT use space in the name. Example: JanDoeII is good, while Jan Doe II is bad.
Now that you have created a new user:
- Choose the folders we recommend; their full path name has no
space. - We will support you only if you use
Documentsfolder:-
Windows location:
C:\Users\NAME\Documents\BareMetal-C -
macOS location:
/Users/NAME/Documents/BareMetal-C
-
WSL prepartion (Windows only):
Click Windows start button and type:
turn windows features on or off
Run it. Scroll down and check ✔
☑ Windows Subsystem for Linux
and click OK.
Reboot if necessary.
Check your current WSL version:
-
Type
Win+Rand runcmdorpowershelland type:wsl --version -
If it says
WSL version: 2.x.x, you’re ok.But if it is
1.x.x, you must updateWSLtoWSL2by:wsl --updateReboot.
After reboot, do
wsl --versionagain to check that you are onWSL version: 2.x.x.
1. (Windows & macOS) Install GitHub Desktop
-
Download GitHub desktop from GitHub desktop page.
-
Run it. You don’t need to sign up, but you need to provide an email address and name. It’s best that you do not share the same email address with friends. It can cause problems later.
-
From File menu, click Clone a repository from the internet and select URL.
-
Before cloning the following URL:
https://github.com/kongkrit/BareMetal-C -
For Windows & macOS: Use
Documentsfolder. Read carefully:-
GitHub Desktop will try to foce you to use
Documents/GitHubfolder. Override it! -
Windows: Use local path
C:\Users\NAME\Documents\BareMetal-C -
macOS: Use local path
/Users/NAME/Documents/BareMetal-C
The screenshot below is for username
dev: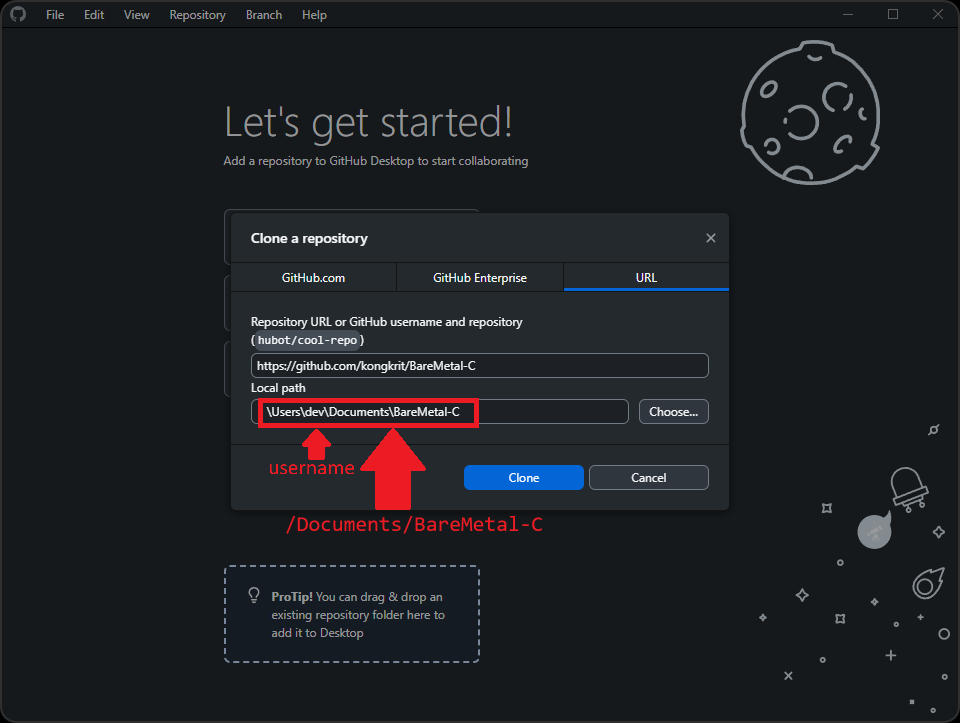
-
-
Click
Cloneand wait for it to finish. Now everything resides inDocuments/BareMetal-Cfolder.
2. (Windows & macOS) Install Docker Desktop
-
Make sure you have admin rights on your computer. That is, you can install new programs for all users, etc.
-
Make sure you don’t have anything important running.
Docker Desktopmay force you to log out to complete the installation. -
Download
Docker Desktopfrom Docker.Click Download Docker Destop and choose the drop down that matches your computer’s CPU:
-
Windows: Choose
Windows AMD64 -
macOS with M-series chip (starting in late 2020):
Mac - Apple Silicon -
Older macOS with Intel CPU (before late 2020):
Mac - Intel Chip
-
-
Install
Docker DesktopandAcceptDocker Subscription Service Agreement. It’s free for personal use.
### For Windows:
-
Make sure the following box is checked ✔. We will use
WSL2:☑ Use WSL 2 instead of Hyper-V -
and we recommend you not to install Windows containers:
☐ Allow Windows Containers to be used with this installation -
Add shortcut to desktopchoice is totally up to you. -
Afer installation, it will force you to log out. Just log back in.
-
You can skip all the questions
### For macOS:
-
Drag and drop
Dockerinto yourApplicationsfolder -
Run
Dockerand selectUse recommended settings -
You can skip all the questions
-
Accept all the permissions
-
Wait for the docker icon (a whale with containers on top) on menu bar to stop dancing.
### For both Windows / macOS:
-
AcceptDocker Subscription Service Agreement. It’s free for personal use. -
Select
Personal, notWork, and you can skip giving out your email address. -
You’re free to
Skipanswering all other questions as well. -
Make sure you get to the
Docker Desktopmain window. It should have tabs on the left side, like:Containers,Images,Volumes, etc. -
Automatically start
Docker Desktopevery time you start your computer: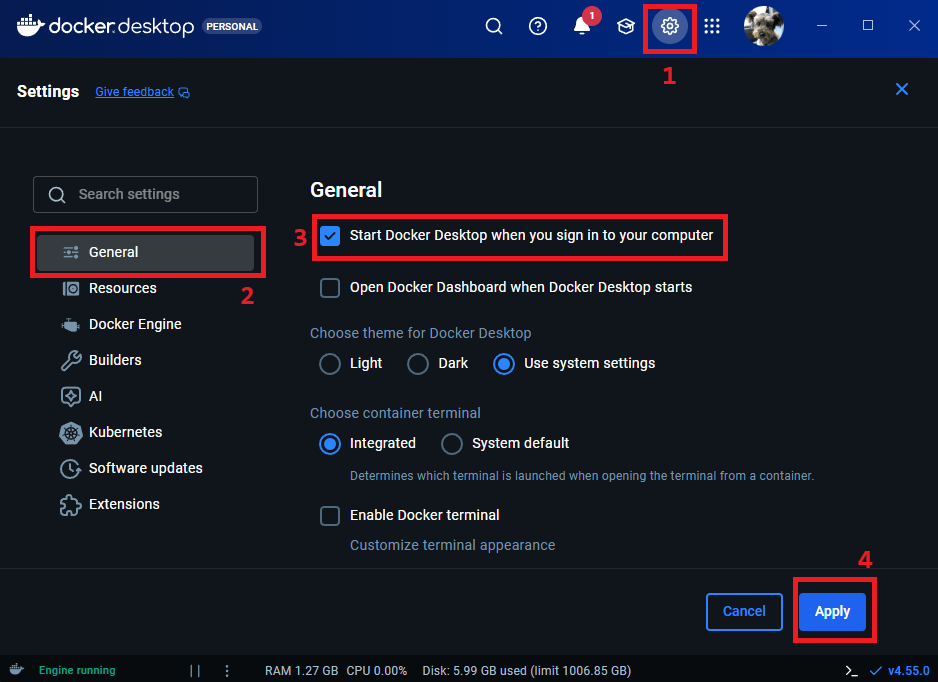
- On
Docker Desktopmain window, on the upper right bar, click⚙ (gear icon)for settings, then clickGeneraltab on the left. We recommend:
☑ Start Docker Desktop when you sign in to your computer ☐ Open Docker Dashboard when Docker Destop starts - On
-
Click
Applyon the bottom right to save settings. -
You can close
Docker Desktopmain window now.
3. Pull the course software container
Windows and macOS instructions are a bit different here.
For Windows:
-
Click Start Menu and type
powershell. Hit enter. A new window opens with prompt:PS C:\WINDOWS\system32> -
Copy and paste the following:
cd "$HOME\Documents\BareMetal-C"; if ($?) { docker run --rm -v "${PWD}\.vscode:/target" ghcr.io/kongkrit/baremetal-c cp -r /usr/share/sdcc/include /target/sdcc-include }; if ($?) { Write-Host "`nSetup Complete" -ForegroundColor Green }Wait a while, and you should get message:
Setup Complete
For MacOS
-
Open
terminalapp: -
At the prompt, copy and paste the following:
cd ~/Documents/BareMetal-C && docker run --rm -v "${PWD}/.vscode:/target" ghcr.io/kongkrit/baremetal-c cp -r /usr/share/sdcc/include /target/sdcc-include && printf "\nSetup Complete\n"Wait a while, and you should get message:
Setup Complete
4. Check sdcc-include
-
Copy and paste the following into prompt:
ls .vscode/sdcc-include/stdi*.hYou should see
stdint.handstdio.hsomewhere in the output.
5. Try tool command line
-
Copy and paste the command below into Windows Powershell or macOS terminal:
docker run --name baremetal-c --rm -it -v ${PWD}:/BareMetal-C ghcr.io/kongkrit/baremetal-c -
Your prompt will change to:
Welcome to student BareMetal-C Environment
0.4.1 2026-01-01 19:22:39+0700
[student]:/BareMetal-C #
If you get the above prompt, your installation is successful.
-
From now on, we will call
[student]:/BareMetal-C #the tool prompt.
6. Test the tools (same for Windows and macOS)
Type all the commands from the tool-prompt:
Check sdcc z80dasm and make – all from tool-prompt:
Check sdcc:
sdcc --version
It should say: SDCC : mcs51/z80/.../f8 TD- 4.5.0 #15242 (Linux)
Check sdasz80:
sdasz80 2>&1 | head -n 3
It should say: sdas Assembler V02.00 + NoICE + SDCC mods (Zilog Z80...)
Check z80dasm:
z80dasm -V
It should say: z80dasm, Z80 assembly language generating disassembler...
Check compilation:
We use make to build our C programs.
make DIR='_test_setup' RECURSE=0
and it should say (not exactly, but very similar):
  ...
  NON_HANDLER_OBJ - _test_setup/blinking_running_led.rel
  HANDLER_OBJ     -
  STARTUP_OBJ     - _defaults/startup_no_int.rel
  MEMMAP          - _defaults/memmap.ld
-b _CODE = 0x0100
-b _DATA = 0x4200
-g _STACK_TOP = 0xC000

sdcc -mz80 --no-std-crt0 _defaults/startup_no_int.rel  _test_setup/blinking_running_led.rel -Wl-u -Wl-f,_defaults/memmap.ld -o _test_setup/_test_setup.ihx

>> Generating Binary and Disassembly _test_setup.bin and _test_setup.txs...
sdobjcopy -I ihex -O binary _test_setup/_test_setup.ihx _test_setup/_test_setup.bin
z80dasm -a -l -t -g0 _test_setup/_test_setup.bin 2> /dev/null > _test_setup/_test_setup.txs
2025-12-31 17_13_50 +0700 ------------ built _test_setup.bin ------------
7. Test Clean-up
Go back to the tool prompt and type:
make clean DIR='_test_setup'
and it should say:
    ...
 >> Cleaning artifacts in code folders (recursive)...
    cleaning _test_setup
2025-12-22 23_33_06 +0700 ------------ clean successful ------------
How to logout of the tool prompt.
and get back to tool-prompt:
Log out of tool-prompt. Easy. type ctrl + d or type exit and you will see:
[student]:/BareMetal-C/code # exit
exit
and the prompt changes to PS C:\... (Windows), or name@computername BareMetal-C % (macOS)
8. How to get back to the tool-prompt:
-
Make sure that
Docker Desktopis running. -
Make sure you’re in the correct folder (
BareMetal-C). -
Repeat steps in section 5. Try tool command line above.
9. Next Step:
Goto set up SimulIDE.
Go back to home page